What a weekend!
Saturday started off early. Stuart Natoff came over to weld the front of our frame. He fabricated a beautiful replacement segment, then welded it right in. Turns out, Rick didn't have to recut the damaged part flush with the frame, but the new piece was so well made, it slotted in there easily. Due to the access to the belly pan, we were able to weld it from both the inside and the exterior sides. Afterwards, Stuart connected it to the skin with a couple of clecos (a kind of temporary rivet, which allows you to position things). The result was absolutely amazing. Previously, our trailer would lurch on its frame whenever anyone stepped onto the entry step. That has stopped. The whole trailer finally has a very solid feel.
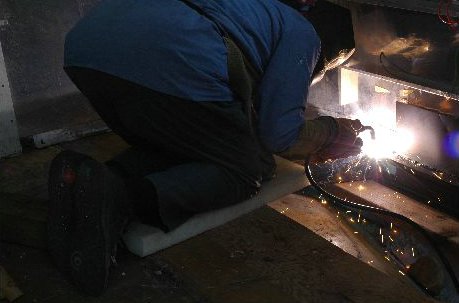
Welding the front end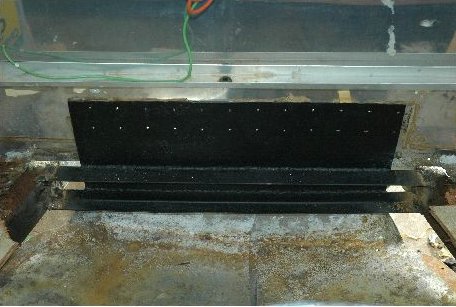
Result: nice new front end support
Now it may be a deep phobia, but I just cannot tolerate rodent droppings. Rick finds this a bit absurd, but it makes me start to think of hantavirus, the black plague and lots of other deadly diseases. It didn't matter to me that the sky was going nuts outside and the wind was pummelling the trailer. I pulled on my respirator and rubber gloves and got sweeping! I finished with a final spray of cleanser. Ew, ew, ew!
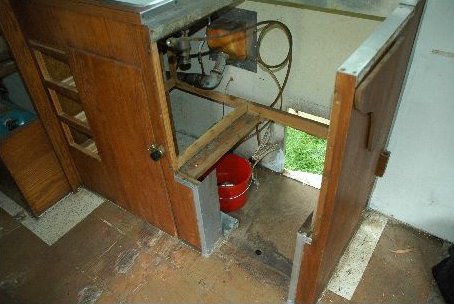
More floor rot found, so we removed the galley (rodent droppings removed)
Once we swept away the floor, the problem under the counter became clearer. Early on, we noticed that the trailer's water inlet leaked, so we've been traveling with bottled water. Now we can see that this had existed as a longer term problem than we'd imagined. I cut a small patch out of the floor. This revealed that in fact the decay is only created a slight disturbance to the top of the wood--but we discussed it and agreed that since the counter is gone and the space is open, we're going to replace it anyways.
So, with that in mind, we got to work on cutting out the rest of the front right flooring section for replacement. Earlier in the week, we'd cut off the bolts connecting to the frame out of the U channels (with a Dremel). Now we started cutting the rest of the wood out, taking turns with a circular saw set to 4/5ths of the plywood depth, then finishing with a jigsaw and a chisel. It all came out pretty easily. Finally we saw the full extent of the old fiberglass repair. Turns out the wood there was rotted all the way through, the repair consisted of a chunk of wood glued in with reinforcement cloth and epoxy. The result was pretty strong, actually, except it created a lump in the floor and they failed to repair all the rot (which appeared to be progressing). One piece of wood was less than a quarter inch thick with a thin layer of epoxy coating!
The weather turned nice, so I finished my efforts by finishing up cleaning out the window frame that had been fully slathered in silicone. Airstream Life Magazine's Rich Luhr had emailed me earlier in the week suggesting I try using a different adhesive remover, so I switched to Kleenstrip Adhesive Remover. This worked pretty well. It got most of the big bits out in quick order, but the tenacious little scraps of silicone, especially those stuck in the corners, still resisted removal. So, on went another layer of adhesive remover, followed after it set with brisk scrubbing with a steel brush and finally, picking out the crevices with a nail file. Ta da!
While waiting for the adhesive remover to work into the silicone, I started to play with two mini projects. I set up a ladder (padded with a towel against the trailer) and looked up on the top of the trailer. I failed to have confidence to climb up off the ladder (it's high and scary up there), however, I did get a good view of the top.
Then I tried to get in a test run with the Alumiweld sticks I got to repair the window frame metal (it cracked apart on one side). This is a kind of low-melt alloy of aluminum that can be melted on to repair aluminum and pot metal with just a propane torch. For my experiment, I pulled out some aluminum flashing sheeting that we had, decided to get artistic and cut out a bunch of aluminum leaves to fuse together. The Alumiweld instruction emphasized getting the base metal extremely hot before melting in the rods, so I grabbed a MAPP gas torch (a more purified kind of propane gas that burns hotter). I lit the torch up, set the flame low and lowered it onto my leaves to heat up the base metal. My pretty spring leaved withered into dry autumn form under the flame. This was so funny to me, I just burned up all the leaves to crumpled form, all the while humming the song "Autumn Leaves" (ok, ok, I admit I have a perverse sense of humor). Turns out, Home Depot flashing is cheaper aluminum than even Alumiweld! Well, I had to clean out the window frames at that point, so I'll give it another try tomorrow, maybe with a cooler burning propane than MAPP gas.
No comments:
Post a Comment