Well, it's been a quiet few days with the trailer. After my csr breakdown, I ended up spending much of the weekend at a reenactment, though I did fit in time to do one more window. Generally, it was nice to take a break, to catch up with friends (who think I am a bit obsessive in my push to finish this) and to review work plans.
Yesterday, Rick picked up the bathtub from the restorer. As it turned out, when we started really looking at the tub carefully, the little gash I had restored on the tub surface was actually a big crack in the back. It was caused by the tub being installed with blocks of wood at one side to slant the tub so the lowest point was the drain hole. The problem with this set up was that there was no bottom support for the fiberglass in between the blocks and the low point--so it cracked, probably multiple times. It ended up being hard to find a fiberglass shop that would handle that repair. The shop did a good job with the crack repair, shot a very nice epoxy paint layer, but I am disapointed that they didn't sand beyond the repair area (I suppose all my sanding efforts were not in vain, it looks pretty good). Honestly, I still think I could have done a better job, had I owned the spray equipment and a dedicated painting space. Still, the tub looks much better than the average tub in a vintage unit. It looks especially lovely sitting in the middle of our living room!
We're in a spell of wet weather right now, which is causing holdups for most of the jobs I want to do now. My largest priority is to remove the rest of the windows to restore them in a bulk fashion. I finally figured out how to remove the glass relatively safely from the windows, but its a slow process, so I want to do a bunch at the same time to move things along. I also want to get out to the window repair shop, but that's something I'm going to have to work out with my boss.
Meanwhile, I am still trying to figure out what is causing the leak on the side of the trailer (over where the old fiberglass repair was). I replaced the window, it's nice and tight, but the bellypan slowly got wet again from the rain. The other thing that might be a leak at the fiberglass skylight filter near there. That may have problems, but I won't know until I get up on the roof, hopefully this weekend.
By the way, I have to add a disclaimer on an earlier posting, since members of my family are now giving my mother a tough time about washing my mouth out with soap. My grandmother Gigi did it! Mom was great--she sympathized with my sad plight, then asked me if the experience left me with any future flavor preferences for soap!
Wednesday, May 25, 2005
Saturday, May 21, 2005
Window Epic Part I
In my ongoing quest to repair my windows, I took a half day off work and made an attempt at getting to Blaine Window Repair yesterday.
Note: emphasis should be placed on "attempt."
However, rain, bad traffic and a broken serpentine belt conspired against me. I ended up shored up on an offramp to the Capital Beltway, vainly flagging passing vehicles for assistance. Finally a fellow stopped and muttered something to me in a slavic language and thrust his cell phone towards me. He looked friendly, so I dialed #77. Some time later (there were lots of accidents out there) I got a tow. Liberated of $128, I got a ride to the garage and walked home. Thus my epic adventure withered to its anticlimatic end four and a half hours after my first efforts for setting out to Silver Spring.
And as for Blaine Window Repair? Turns out the tow truck driver is buds with the owner. "Tell him Larry sent you."

Objective: new window operators
Note: emphasis should be placed on "attempt."
However, rain, bad traffic and a broken serpentine belt conspired against me. I ended up shored up on an offramp to the Capital Beltway, vainly flagging passing vehicles for assistance. Finally a fellow stopped and muttered something to me in a slavic language and thrust his cell phone towards me. He looked friendly, so I dialed #77. Some time later (there were lots of accidents out there) I got a tow. Liberated of $128, I got a ride to the garage and walked home. Thus my epic adventure withered to its anticlimatic end four and a half hours after my first efforts for setting out to Silver Spring.
And as for Blaine Window Repair? Turns out the tow truck driver is buds with the owner. "Tell him Larry sent you."
Objective: new window operators
Thursday, May 19, 2005
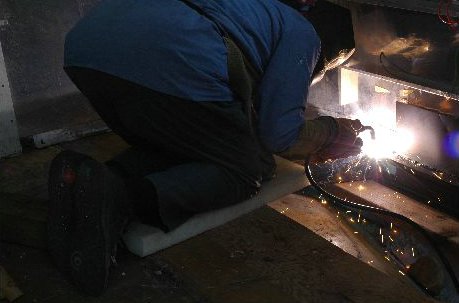
Finally Getting the Hang of Alumiwelding
Last night I finally figured out how to use the Alumiweld system! As the instructions say, you heat up the metal you are welding very hot, remove the torch and melt in the alumiweld stick. The tough part, it turned out, was getting the broken window frame hot enough to melt alumiweld.
I first started by testing the product out on a scrap of bellypan aluminum that Rick removed during last weekend's welding effort. That's a very small piece (3" square, say) of very soft aluminum. It heated up with a regular propane torch fairly rapidly. When it got sufficiently hot, a little bit of the surface did wrinkle, possibly because, as soft aluminum, it probably has a lower melting point. But overall, the test went exceptionally smoothly. Boosted by that, I moved on to my broken window frame.
After about ten minutes of trying to heat the frame, I decided that regular propane wasn't doing the job, so I moved up to the MAPP gas. Then I had a tough time keeping the torch lit. About that time, Rick decided to check up on me. Bad timing. With typical Mars efficiency, he proferred his solution. However, he was hitting this on a frustrated Venutian who really didn't want advice, just caring support and encouragement. Problem was, he was right, darnitall!
So, I let it cool down and found some scrap wood blocks to lift up the frame slightly off the ground, allowing me to hold the gas tank down lower and stop the torch from self extinguishing. I started heating it up again. Then just as I started getting it hot, it warped, moving the broken part out of position. Argh!
I headed into the house, down to the basement and grabbed the first set of nails I could find. I muttering as I passed Rick. Rick bent down over his textbook, recognizing me in a barely rational state. I was on a mission.
After nailing the frame in place, I started heating up the frame again. Oddly, this time, everything went textbook. I got in a nice, flat soldier. Finally! Barely in time--it as pretty dark out by this time. I yelled for Rick and did a little happy dance around the trailer!
OK, some tips...
1. I got my alumiweld from Eastwood Company, who gave me excellent service (received it next day after ordering on standard shipping). They also sell a positioning compound, which turned out to be very useful for getting my (warped) frame to sit correctly. If you can, I'd say, buy that as well.
2. I used an old wooden board as my soldering surface. Given my druthers, I'd have preferred to use a fireproof surface like a piece of Homasote board (available from building supply places). Then I could have clamped it to a work table and soldered away without fear of burning the table up.
3. I think this is definitely something to work on outside. It is pretty darn flammable and probably off gassed (I don't know, I wore my respirator, just in case).

I thought this was a good weld, but as my next entry explains, it wasn't...
I first started by testing the product out on a scrap of bellypan aluminum that Rick removed during last weekend's welding effort. That's a very small piece (3" square, say) of very soft aluminum. It heated up with a regular propane torch fairly rapidly. When it got sufficiently hot, a little bit of the surface did wrinkle, possibly because, as soft aluminum, it probably has a lower melting point. But overall, the test went exceptionally smoothly. Boosted by that, I moved on to my broken window frame.
After about ten minutes of trying to heat the frame, I decided that regular propane wasn't doing the job, so I moved up to the MAPP gas. Then I had a tough time keeping the torch lit. About that time, Rick decided to check up on me. Bad timing. With typical Mars efficiency, he proferred his solution. However, he was hitting this on a frustrated Venutian who really didn't want advice, just caring support and encouragement. Problem was, he was right, darnitall!
So, I let it cool down and found some scrap wood blocks to lift up the frame slightly off the ground, allowing me to hold the gas tank down lower and stop the torch from self extinguishing. I started heating it up again. Then just as I started getting it hot, it warped, moving the broken part out of position. Argh!
I headed into the house, down to the basement and grabbed the first set of nails I could find. I muttering as I passed Rick. Rick bent down over his textbook, recognizing me in a barely rational state. I was on a mission.
After nailing the frame in place, I started heating up the frame again. Oddly, this time, everything went textbook. I got in a nice, flat soldier. Finally! Barely in time--it as pretty dark out by this time. I yelled for Rick and did a little happy dance around the trailer!
OK, some tips...
1. I got my alumiweld from Eastwood Company, who gave me excellent service (received it next day after ordering on standard shipping). They also sell a positioning compound, which turned out to be very useful for getting my (warped) frame to sit correctly. If you can, I'd say, buy that as well.
2. I used an old wooden board as my soldering surface. Given my druthers, I'd have preferred to use a fireproof surface like a piece of Homasote board (available from building supply places). Then I could have clamped it to a work table and soldered away without fear of burning the table up.
3. I think this is definitely something to work on outside. It is pretty darn flammable and probably off gassed (I don't know, I wore my respirator, just in case).
I thought this was a good weld, but as my next entry explains, it wasn't...
Monday, May 16, 2005
Project Record: Window Repair
I'm inserting this in draft form earlier than I intended, since lots of folks are working on restoring windows (and I've got a few emails on this). I am still figuring out a couple of steps (see notes) and will revise this as I work on all the different windows.
Please note--these instructions only apply to 1961-1965 models. I based my approach on RJ Dial's directions.
Difficulty (Scale of 10 Drills): TBD
Materials Used:
Window Gasket (available from airstreamdreams.com)
Glazing Tape (available from airstreamdreams.com)
Carpet knife and fresh razors
Straight edged razor
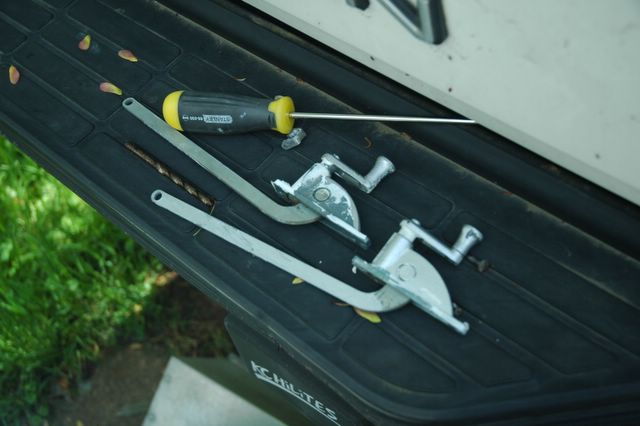
Screwdriver
Pliers
Wire brushes (copper for exterior, steel for inside channel)
Plastic to cover windows
Window sealing tape (weather stripping dept of Home Depot)
Frost King X-treme Rubber Weatherseal (or other rubber D shaped gasket) (or "Bulb seal" from Airstream Dreams
3m Super Weatherstrip Adhesive (yellow) (available from airstreamdreams.com)
Small cutting board
Gasket or adhesive remover (I used Permatex Gasket remover, purchased from Advanced Auto Parts)
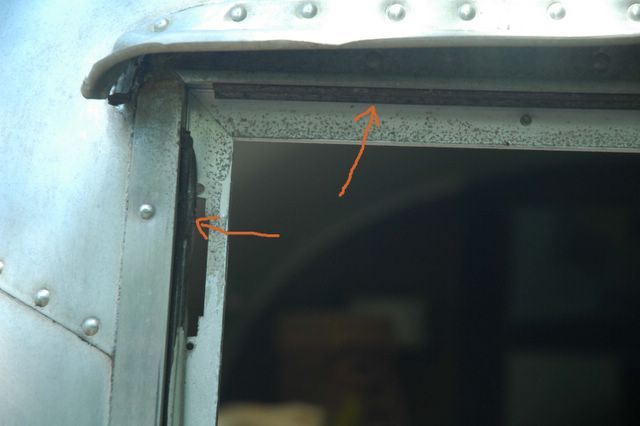
Part 1: Window Removal

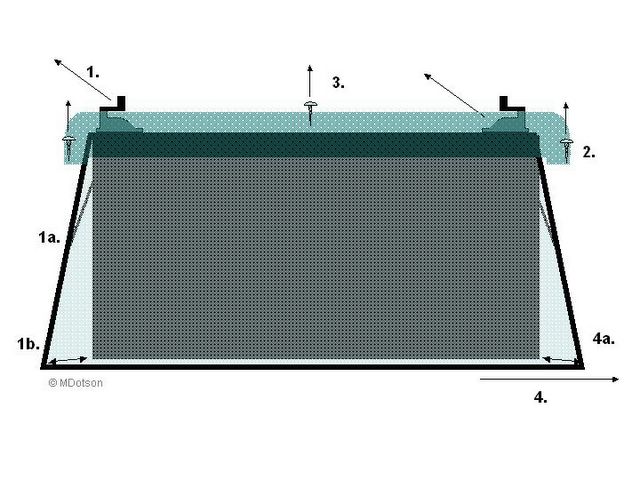
Hehr window removal (click to enlarge)
1. Remove the hand cranks* (1), tilting the window out (1b) so that you can release the window from the sliding mechanisms(1a). Pop them out and set aside in a designated place. We find this easier when a second person holds the window out.
2. Unscrew the side screws holding the window drip channel down on one side (2). Bend the channel up, so the window will slide past it. There is a small screw in the center of the window(3). If you cannot unscrew it by hand, use a set of plyers to remove it (a screwdriver will not reach this screw).
3. Lift the window up to about 2/3 open. Steadily push it out of its channel, towards the direction where you bent the drip channel up (4). This will release the window.
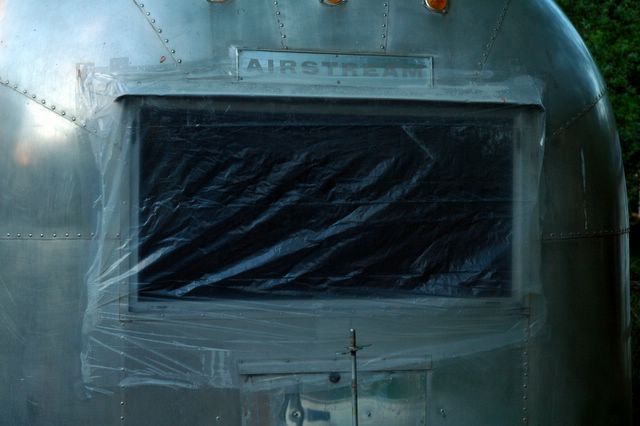
4. Before working with the window, cover the window with plastic and tape. Home centers sell a weather resistant tape with weatherstripping supplies. This product is good, although do note that it will leave a little residue glue on your trailer (though it cleans up easily).
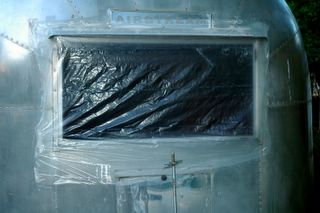
Taped up window
Please note--these instructions only apply to 1961-1965 models. I based my approach on RJ Dial's directions.
Difficulty (Scale of 10 Drills): TBD
Materials Used:
Window Gasket (available from airstreamdreams.com)
Glazing Tape (available from airstreamdreams.com)
Carpet knife and fresh razors
Straight edged razor
Screwdriver
Pliers
Wire brushes (copper for exterior, steel for inside channel)
Plastic to cover windows
Window sealing tape (weather stripping dept of Home Depot)
Frost King X-treme Rubber Weatherseal (or other rubber D shaped gasket) (or "Bulb seal" from Airstream Dreams
3m Super Weatherstrip Adhesive (yellow) (available from airstreamdreams.com)
Small cutting board
Gasket or adhesive remover (I used Permatex Gasket remover, purchased from Advanced Auto Parts)
Part 1: Window Removal
Hehr window removal (click to enlarge)
2. Unscrew the side screws holding the window drip channel down on one side (2). Bend the channel up, so the window will slide past it. There is a small screw in the center of the window(3). If you cannot unscrew it by hand, use a set of plyers to remove it (a screwdriver will not reach this screw).
3. Lift the window up to about 2/3 open. Steadily push it out of its channel, towards the direction where you bent the drip channel up (4). This will release the window.
4. Before working with the window, cover the window with plastic and tape. Home centers sell a weather resistant tape with weatherstripping supplies. This product is good, although do note that it will leave a little residue glue on your trailer (though it cleans up easily).

Taped up window
* Hand crank removal: Unscrew the operators from the inside of the trailer. Open the windows so that the arm aligns with the cutout portion of the channel. Inside the channel, the arm is secured to a little plastic slider with a spring. You may be able to ease the slider out or get it out by compressing the spring. Chances are, it will break, since the plastic tends to harden. Replacements (without springs) are available from Inland RV, however, they are very costly. RJ Dial suggests using a nylon nut and bolt instead, which I am going to try when I address this problem.
Part 2: Window Repair

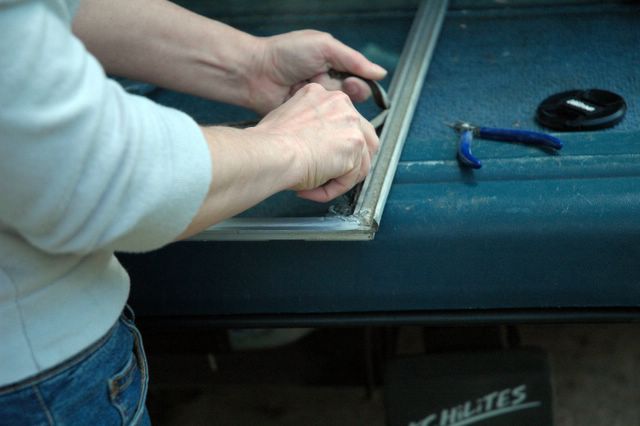
Start removal of the old gasket at the corners
Once you get the corner out, it is easy to pry the rest loose with a screw driver.

Working out the old gasket
2. The toughest part for me is removing the glass from the glazing tape. Right now I'm experimenting with applying different kinds of adhesive/gasket removers to the crack where the glass meets the aluminum, in hopes that it will seep down and soften the glazing tape. Hopefully, this will work and you can gently pry the glass out of the frame using a carpet razor. So far, this has led us to broken glass. Fortunately, the windows from this era were made of generic glass and are easily replaced.
3. Clean out the old glazing tape using gasket remover (I found Permatex gasket remover worked best). Scrub this channel clean (I used a wire brush), as it is your primary waterproof seal area. Optional--clean and polish the exterior of the frame (see earlier entry on this).

Removing old window adhesive
4. Roll out a strip of new glazing tape into the channel where the old glazing tape was. Trim it so there are no gaps. Carefully lower the glass pane back into the frame, setting it down on the glazing tape (I found this easiest with a helper, since there is no moving the glass again after you've set it down--that glazing tape really sticks to glass).

Applying glazing tape
5. Use a flat edged razor and a small cutting board to mitre the starting edge of the new window gasket. Firmly pry it into the corner, making sure the lip gets wedged into the channel. Feed and pry it in place without stretching it. When you come close (say, 2 inches) to a corner, calculate where to cut it. I find it easiest to finish if I wedge it into the corner first, then work back to where I stopped to trim it.
6. Replace the window, reversing the procedures detailed previously. I am buying replacement operators, so I have not reinstalled these. I will post more info on this, when I do.
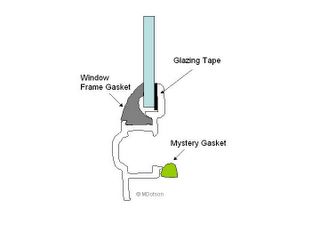
Part 3: The Mystery Gasket
I found a mystery gasket sealed the window inside the trailer wall. It is green in the window profile drawing above. You can also see a photo of it in the wall here.

The mystery gasket
This was stiff and cracked, so I decided to replace it as well. To do this, I bought "D" shaped gasket at Home Depot.

Replacement for the mystery gasket--later I found it in grey, which looks much less conspicous
1. Remove the old gasket and clean the channel it sat in with window cleaner.
2. I found that the adhesive on the new gasket was inadequate. Instead, use 3m Super Weatherstrip Adhesive on the gasket, press it into place. Trim at the ends.
Since writing this, Airstream Dreams has solved the identity of the mystery gasket. It is called "bulb seal" and it will be available at their website starting 6/17/05. Unlike weatherstrip, it will not require adhesive. While I have completed all my windows with weatherseal, I am going to test out the new "bulb seal" one one window. My impression is that it will probably be a bit more durable than weatherstripping (which I expect will only be good for a year or two), though I don't know if it will give as tight a seal.
Part 2: Window Repair

Window profile(click to enlarge)
1. Put the window on a smooth, cushioned surface. Work the old gasket out of the window. I found it easiest to start at the corners, inserting a carpet razor into the outer edge and then working it out.
Start removal of the old gasket at the corners
Working out the old gasket
3. Clean out the old glazing tape using gasket remover (I found Permatex gasket remover worked best). Scrub this channel clean (I used a wire brush), as it is your primary waterproof seal area. Optional--clean and polish the exterior of the frame (see earlier entry on this).

Removing old window adhesive
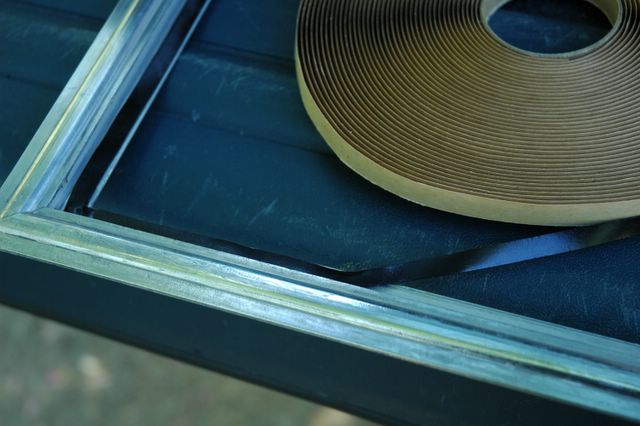
Applying glazing tape
6. Replace the window, reversing the procedures detailed previously. I am buying replacement operators, so I have not reinstalled these. I will post more info on this, when I do.
Part 3: The Mystery Gasket
I found a mystery gasket sealed the window inside the trailer wall. It is green in the window profile drawing above. You can also see a photo of it in the wall here.

The mystery gasket
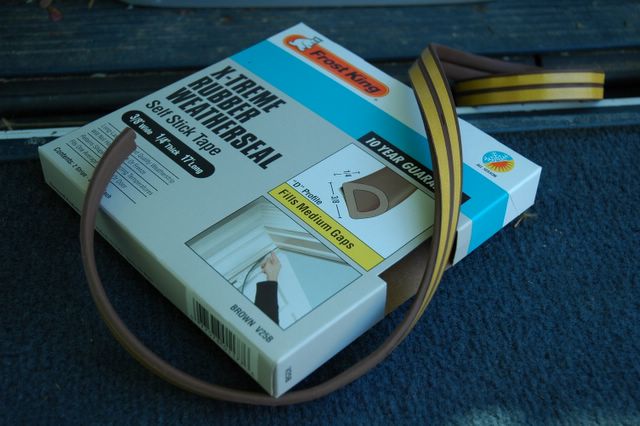
Replacement for the mystery gasket--later I found it in grey, which looks much less conspicous
2. I found that the adhesive on the new gasket was inadequate. Instead, use 3m Super Weatherstrip Adhesive on the gasket, press it into place. Trim at the ends.
Since writing this, Airstream Dreams has solved the identity of the mystery gasket. It is called "bulb seal" and it will be available at their website starting 6/17/05. Unlike weatherstrip, it will not require adhesive. While I have completed all my windows with weatherseal, I am going to test out the new "bulb seal" one one window. My impression is that it will probably be a bit more durable than weatherstripping (which I expect will only be good for a year or two), though I don't know if it will give as tight a seal.
Welding and Still More Demolition
What a weekend!
Saturday started off early. Stuart Natoff came over to weld the front of our frame. He fabricated a beautiful replacement segment, then welded it right in. Turns out, Rick didn't have to recut the damaged part flush with the frame, but the new piece was so well made, it slotted in there easily. Due to the access to the belly pan, we were able to weld it from both the inside and the exterior sides. Afterwards, Stuart connected it to the skin with a couple of clecos (a kind of temporary rivet, which allows you to position things). The result was absolutely amazing. Previously, our trailer would lurch on its frame whenever anyone stepped onto the entry step. That has stopped. The whole trailer finally has a very solid feel.
Welding the front end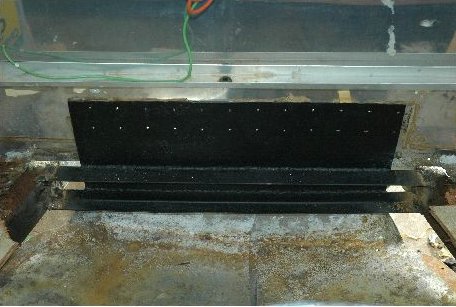
Result: nice new front end support
A bunch of clecos hold it in place from the outside
After Stuart left, I headed out to Home Depot and Rick started to remove the old furnace. I got home in time to catch a last blow and the furnace's emergence from its side access hole. Inside we checked the space underneath. Rick noticed some more punky wood. I noticed animal droppings. Neither of us liked what we saw. But we ended up scrambling to cover everything as a violent thunderstorm rolled in.
Now it may be a deep phobia, but I just cannot tolerate rodent droppings. Rick finds this a bit absurd, but it makes me start to think of hantavirus, the black plague and lots of other deadly diseases. It didn't matter to me that the sky was going nuts outside and the wind was pummelling the trailer. I pulled on my respirator and rubber gloves and got sweeping! I finished with a final spray of cleanser. Ew, ew, ew!
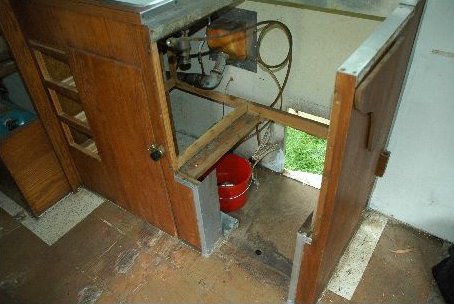
More floor rot found, so we removed the galley (rodent droppings removed)
So Sunday morning, we decided to get in some more demo work. The stove came out easily--just remove the fastening screws, unclamped the gas lines and it slid out. We found the counter also fairly simple to remove. The cabinet itself wasn't so cooperative. It had a number of hard to reach screws in the back connecting to a wall (needed a short stumpy screwdriver for this)--and fully corroded screws connecting it to the flooring. After drilling out the floor screws, the unit finally slid out. It's surprisingly rickety.
Once we swept away the floor, the problem under the counter became clearer. Early on, we noticed that the trailer's water inlet leaked, so we've been traveling with bottled water. Now we can see that this had existed as a longer term problem than we'd imagined. I cut a small patch out of the floor. This revealed that in fact the decay is only created a slight disturbance to the top of the wood--but we discussed it and agreed that since the counter is gone and the space is open, we're going to replace it anyways.
So, with that in mind, we got to work on cutting out the rest of the front right flooring section for replacement. Earlier in the week, we'd cut off the bolts connecting to the frame out of the U channels (with a Dremel). Now we started cutting the rest of the wood out, taking turns with a circular saw set to 4/5ths of the plywood depth, then finishing with a jigsaw and a chisel. It all came out pretty easily. Finally we saw the full extent of the old fiberglass repair. Turns out the wood there was rotted all the way through, the repair consisted of a chunk of wood glued in with reinforcement cloth and epoxy. The result was pretty strong, actually, except it created a lump in the floor and they failed to repair all the rot (which appeared to be progressing). One piece of wood was less than a quarter inch thick with a thin layer of epoxy coating!
The weather turned nice, so I finished my efforts by finishing up cleaning out the window frame that had been fully slathered in silicone. Airstream Life Magazine's Rich Luhr had emailed me earlier in the week suggesting I try using a different adhesive remover, so I switched to Kleenstrip Adhesive Remover. This worked pretty well. It got most of the big bits out in quick order, but the tenacious little scraps of silicone, especially those stuck in the corners, still resisted removal. So, on went another layer of adhesive remover, followed after it set with brisk scrubbing with a steel brush and finally, picking out the crevices with a nail file. Ta da!
While waiting for the adhesive remover to work into the silicone, I started to play with two mini projects. I set up a ladder (padded with a towel against the trailer) and looked up on the top of the trailer. I failed to have confidence to climb up off the ladder (it's high and scary up there), however, I did get a good view of the top.
Then I tried to get in a test run with the Alumiweld sticks I got to repair the window frame metal (it cracked apart on one side). This is a kind of low-melt alloy of aluminum that can be melted on to repair aluminum and pot metal with just a propane torch. For my experiment, I pulled out some aluminum flashing sheeting that we had, decided to get artistic and cut out a bunch of aluminum leaves to fuse together. The Alumiweld instruction emphasized getting the base metal extremely hot before melting in the rods, so I grabbed a MAPP gas torch (a more purified kind of propane gas that burns hotter). I lit the torch up, set the flame low and lowered it onto my leaves to heat up the base metal. My pretty spring leaved withered into dry autumn form under the flame. This was so funny to me, I just burned up all the leaves to crumpled form, all the while humming the song "Autumn Leaves" (ok, ok, I admit I have a perverse sense of humor). Turns out, Home Depot flashing is cheaper aluminum than even Alumiweld! Well, I had to clean out the window frames at that point, so I'll give it another try tomorrow, maybe with a cooler burning propane than MAPP gas.
Tuesday, May 10, 2005
Silicone
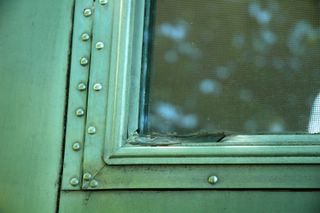
I decided to take on the trailer’s rear window after work last night. It’s that silicone encrusted window I photographed last week. Getting it out was fairly easy, since all the operators had separated from the window (nor, for that matter, do they appear to operate) and the screws attaching it were already loosened. I sprayed on a thick layer of gasket remover and started to take on the silicone.

The channel in the windowframe was filled with silicone instead of a proper gasket
The layer of silicone holding the glass into the frame ended up being moderately manageable to remove. It just took several (about 5) passes with a putty knife and two hits with gasket remover and it slowly eased out. To my surprise, I found that one end of the frame had separated and had been held in place with silicone. Distantly, I recall that the previous owner had mentioned when I picked up the trailer that they’d broken the window operators during their big trip in the trailer the previous winter. This window started telling a story of an epic road disaster, leading to frenzied efforts with silicone. I like these folks, but right now, this silicone is irritating me, getting in my hair and pretty much annoying me.
I moved on to cleaning out the segmented aluminum channels filled with silicone.
There is no way to describe the tedium of removing silicone from aluminum. It is slick, something like greased over pork gelatin (and need I write that I don’t eat meat). It resists constraint, even from a sharp edge like a razor. It brought out the fiercest cleaning effort on my part—I found myself exerting the kind of determined scrubbing effort I can only recall my grandmother making in my early childhood. I can’t try to write how many gouges I made in the frame in this effort, although I suppose if the gouges are inside the window frame channel, it won’t really matter, since nobody will ever see them. After two hours of frenzied scouring, dark started to fade in. All that work, and I had only proceeded through one side of the frame—and there were still little traces of silicone in the channel.
Right now, I’m wondering if it really matters if there are random traces of silicone left behind, so long as the channel the gasket mounts to is clear.
All of this has left me musing about cursing. Bear in mind, I come from a family where my 4 year old niece thinks that the word “stupid” is a dirty word. I was fairly naïve myself as a child, getting my mouth literally washed out by soap after uttering a word I had learned from reading a Sherlock Holmes book, “dastardly.” Generally, I find curse words to be occassionally necessary exclamations, though lacking in originality and style. But every once in a while, I find a project like this silicone effort spurs so much frustration that it inspires me to try to invent a truly novel utterance of vulgarity. Consider the whole genre of cowboy vulgarity—half wild exaggerations that use panache to compare bad circumstances to the bluer side of rural life. But I don’t live in a farm and there is little vulgar panache to be found in general office work (cleaning out this window frame is like getting a virus that only lets you see one pathetic ugly porn website). Nope, there’s no {insert wildly creative vulgarity here} creativity or flair there.
Sunday, May 08, 2005
Gorgeous Day to Work...and Not Work!
Today the weather was absolutely perfect. Warm, but not too warm. Spent the whole day working outside and not working outside! Couldn't help pulling on the old WBC (that's right, so old there wasn't another C and an I!) beret. It's the vintage one I bought off ebay after seeing the really cool old Airstreamer beret at the Cherry Blossom rally. I know there are the folks who think the berets look silly, but I LOVE my beret! It makes me feel--well, rather pretty.

A nice day for working outside So, went to town on cleaning. Organized the tools, then started sweeping. I've decided that the hantapoopies identification was wrong, based on the copious number of acorns stored under the tub area. I think it was more like chipmunk poopies, which is nicer, since while they still can make me sick, I don't face the prospects of dying from exposure. Looks like a chipmunk (I don't think it was a squirrel, since our squirrels are too fat) may have fit into the bellypan, then ran up the p-trap hole into the trailer behind the tub. Makes me think we'll have to see about the joints in the belly pan. Finally finished by scrubbing out the tub and hosing off the toilet. It still has the yucky wax seal, but I'm not feeling the urge to go crazy with this quite yet.
Finally decided to go ahead and get a professional job done on the tub. It's not that I don't think I can finish it, but I do think a pro will be able to shoot a much nicer spray coat and get better results in a dust free spray room than I ever could. Rick agrees--we're going to look into this later this week.
After that, went to work on the windows. Finally got the first window completed, reinstalled, save for the operator. Turns out the company that sells the replacement operators has their store in close by in Silver Spring, MD! Pretty darn cool--so will try to get down there soon as well.
Getting the gasket in the window turned out to be rather slow work. It really jams in there, so it took about two hours to work it in with a putty knife and a screwdriver. But if slow, it was pretty easy. Finally it was done, got Rick to help me reinsert it. Then I used some regular D shaped weather stripping from Home Depot to replace the "mystery gasket." Unfortunately, though the stuff had adhesive, it really didn't stick, so I'm going to have to get some gasket adhesive to keep it in place. But overall, the window looks great.

Beautiful new window with clean gaskets
Then I started thinking about doing another window, but momentum stopped for me. I installed new lenses on the taillights--managed to crack one by overtightening (it stays for a while, I'm afraid). I also played with installing a new locking deadbolt, but realized the old strikeplate was slightly too small for it. Considered taking it off and grinding it larger, but decided to take a nap instead. Woke up and decided to faux paint my gas tanks instead.
Painting the gas tanks was fun, little effort, cheap and rewarding. Now they look like brushed aluminum, instead of rusting off white! Yay!

A nice day for working outside
Finally decided to go ahead and get a professional job done on the tub. It's not that I don't think I can finish it, but I do think a pro will be able to shoot a much nicer spray coat and get better results in a dust free spray room than I ever could. Rick agrees--we're going to look into this later this week.
After that, went to work on the windows. Finally got the first window completed, reinstalled, save for the operator. Turns out the company that sells the replacement operators has their store in close by in Silver Spring, MD! Pretty darn cool--so will try to get down there soon as well.
Getting the gasket in the window turned out to be rather slow work. It really jams in there, so it took about two hours to work it in with a putty knife and a screwdriver. But if slow, it was pretty easy. Finally it was done, got Rick to help me reinsert it. Then I used some regular D shaped weather stripping from Home Depot to replace the "mystery gasket." Unfortunately, though the stuff had adhesive, it really didn't stick, so I'm going to have to get some gasket adhesive to keep it in place. But overall, the window looks great.

Beautiful new window with clean gaskets
Painting the gas tanks was fun, little effort, cheap and rewarding. Now they look like brushed aluminum, instead of rusting off white! Yay!
Saturday, May 07, 2005
Vanity, crap and possession
I have believed for a while that our bathtub has something seriously wrong from a psychic sense. It has caused me no end of misery in restoring it. I have spent countless hours cramped in uncomfortable positions trying to make its ugly cracked dingy surface into something--well--that anyone would want to bath in. Along the way even that ambition got compromised. Maybe if I could just make it so someone...anybody, please, want to use my tub???
No, it just continued to be a time sink, ending up in a stasis of varying levels of, well, revoltingness. Last weekend, I spent hours sanding the tub down to a reasonable smoothness--with my husband, Rick, shaking his head in puzzled amusement when I told him it was cursed, that it was inhabited by a demon, that it needed excorcism.
Tonight, I don't think Rick disagrees with my assessment, although I feel that its liberation from the trailer may have been spiritually cleansing, hopefully divorcing it from the miscellaneous poltergeists it has obviously aquired in its life.
Goal today--clear out the bathroom. We started with removing the top of the vanity (some mildly tricky screws) then moved on to removing the toilet.

Toilet removal
That was fairly easy. Next came the vanity body. It also removed after a bit of convincing (some more odd screws)--and guess what--we found hantapoopies left behind (YUCK).
Then came the tub. First we removed all the rivets and removed the P trap.

Access to the P trap under the bathtub
Then we took out most of the gaucho frame to see if there were screws holding in the tub.
No dice.
Then we removed the sliding door and the door trim (requiring cutting out lots of eensy teensy finish nails). This revealed still more screws that were removed.
No movement.

Working the tub free
Finally, Rick released the partition. This revealed that all screws had been removed. Only one thing was possible.
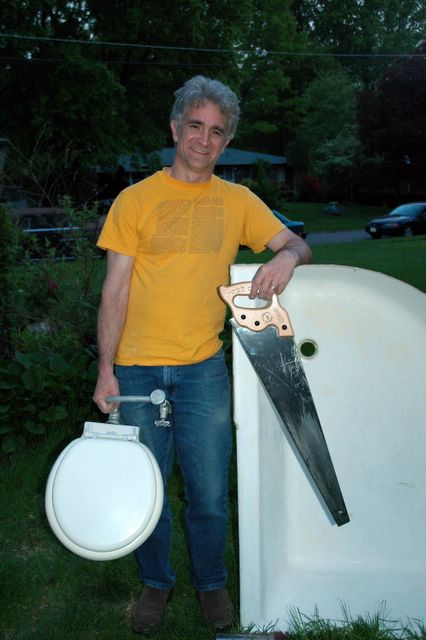
The tub was glued to the floor. Glued well, good and solidly (just like an Airstream)! Dagnabit all, Wally, why did they do this?
Rick spent another four hours sawing under the tub. Finally after a whole day effort on the bath, the tub released at 7:45 pm.

The face of victory!
Underneath, we found two things: a very old fire extinguisher and a candle with a teeny little note exhorting Jesus and God to stop Karen from doing drugs. Now, we don't know who Karen was or is, but obviously, this tub has been beset with some powerfully bad ju-ju.

Finally, the tub is out--some glued bits are still visible
We felt that while we may have not released Karen, we did release the tub. I went off for beer, salsa, shrimp and steak (most for Rick, since he did the heavy work).
Who ever that said bathtubs can't be possessed? I just hope this is over with it, finally...

New interior view...Darn, I have a lot to clean, but that will wait until tommorrow...
No, it just continued to be a time sink, ending up in a stasis of varying levels of, well, revoltingness. Last weekend, I spent hours sanding the tub down to a reasonable smoothness--with my husband, Rick, shaking his head in puzzled amusement when I told him it was cursed, that it was inhabited by a demon, that it needed excorcism.
Tonight, I don't think Rick disagrees with my assessment, although I feel that its liberation from the trailer may have been spiritually cleansing, hopefully divorcing it from the miscellaneous poltergeists it has obviously aquired in its life.
Goal today--clear out the bathroom. We started with removing the top of the vanity (some mildly tricky screws) then moved on to removing the toilet.

Toilet removal
Then came the tub. First we removed all the rivets and removed the P trap.

Access to the P trap under the bathtub
No movement.
Then we took out most of the gaucho frame to see if there were screws holding in the tub.
No dice.
Then we removed the sliding door and the door trim (requiring cutting out lots of eensy teensy finish nails). This revealed still more screws that were removed.
No movement.

Working the tub free
The tub was glued to the floor. Glued well, good and solidly (just like an Airstream)! Dagnabit all, Wally, why did they do this?
Rick spent another four hours sawing under the tub. Finally after a whole day effort on the bath, the tub released at 7:45 pm.
The face of victory!

Finally, the tub is out--some glued bits are still visible
Who ever that said bathtubs can't be possessed? I just hope this is over with it, finally...

New interior view...Darn, I have a lot to clean, but that will wait until tommorrow...
Project Record: Refinishing Window Frames
I have resolved this week that there is in fact, a right way and a wrong way to clean up window frames. This revellation came to me today after spending a week trying various techniques to clean up the window frame I removed last week from the back of the trailer.

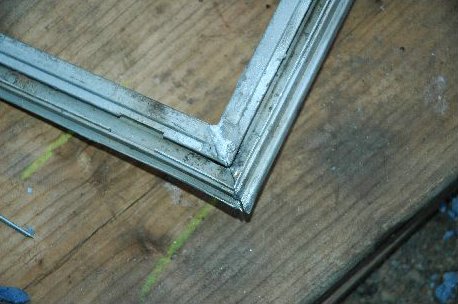
Before polishing, the frame is dull and unreflective
The wrong way is to use a Dremel polishing kit and a wire wheel to clear off the silver toned paint a previous owner felt enhanced the natural aluminum finish. This way can only lead to hours of frustration, gouges and rough patches in the frame, black polish all over the polisher, achey arms from working hours on the polish and a deep yearning for something stronger than wine to help you forget what a mess you've just made of the window frame.
The right way is pretty darn simple and even removes most traces of the stupid mess the wrong way made for you.
Difficulty: (scale of 10 drills):
Materials:
Medium and Fine grade steel wool
Bathroom cleaner (anyone will do, I used Tile X)
Aluminum polish (whatever you can get that is rated for polishing aluminum--I used Mother's Aluminum Polish)
Paper Shop Towels
Warning--this is a really messy project. Wear clothes you can machine wash. You may want to wear gloves, though I found that if scrubbed, the polish mess comes off the skin fairly easily.
1. Use orange paint remover to strip off any elements of the silver paint left on by a previous owner (optional, considerate previous owners may not have left you such a inheritance). Tease off remnants of paint with a nylon scrub brush (not wire!), rub down with paper towels, then rinse off all remnant of the orange goo with water. Let dry overnight.
2. Spray the surface in segments with bathroom cleaner and scour thoroughly with fine steel wool. If this fails to lift up surface oxidation (ie, the little spots), use medium steel wool and scour until the oxidation is satisfactorily removed. Rub off with paper shop towels.
3. Polish surface with aluminum polish (almost any kind will do, this isn't a plated surface like alclad). This is best if done by hand.
4. Buff off the remaining polish with a clean paper shop towel. When the towel surface gets black, move to a clean part of the towel.
I managed to make an easy task very onerous here. But heck, think of the calories I burned!

After polishing, the window frame is shiny and ready to replace
Sunday, May 01, 2005
Weekend work report
A year ago, I first tried restoring my bathtub. Unfortunately the surface was so far cracked, the restoring compound ended up seeping up out of the cracks. Saturday, I started correcting those cracks.
Saturday I woke up achey, but I downed a couple of naproxen, strapped on my respirator and safety glasses and headed to work. The time horizon for this effort is somewhat limited--when we attack the back of the trailer, we'll be removing the tub, so I want to refinish it before that time.
After several hours of fighting a bucking sander, I stood up and removed myself from the tub. Granted, it was a cold, wet, rainy day--but every muscle in my body was stiff and cramped. I felt miserable. Moreover, I was completely covered with epoxy dust. Quickly I jumped into a hot tub and scrubbed myself all over. When I got out, I was sorer still. After a couple more hours of pain, I gave in and downed a Celebrex and went to bed.
By morning, the Celebrex had kicked in. Today, Rick was going to help me for part of the day (he's studying for finals right now). First we went out to Home Depot for a new Dremel head, then had breakfast out. When we got back, I put my "dust clothes" on and went back to sanding the tub. I sanded it to smooth across most of the surface. My next step will be to put a new layer of epoxy, smooth sand, then finish off with the refinishing compound (Homax's Tough as Tile). I am also going to reinforce a mended crack from the back when I get it out. Right now, I think if the rest of my steps go well, the results will be better than the original tub. I have found several "OEM" drips and spatters--these will be gone now.
Meanwhile, Rick took over in grinding down the cuts I made to the frame last Wednesday. Earlier last week, he bought a new Rotozip tool. He was looking forward to getting to use it.
My next goal is to replace all the seals on the windows. While Rick worked on his grinding, I got to work on refinishing my first window. I worked by following the project mentioned on RJ Dial's webpage.
Window seals are in bad repair...

And one window doesn't even have a gasket (that's just a fat bead of silicone holding that window in)!
I have to say, if I ever were to rate a project based on "pains in the asses," this would bring in a whole herd of donkeys! Opening the window was a mystery to me, but I figured it out after a lot of trials. When I finally got it ready for removal, I found it was too stiffly encased for me to remove by myself. I had to get Rick to help me remove the window, there was a mystery gasket I hadn't expected, the glass cracked when Rick tried to separate it from the window tape (no biggie, it's easily replaced), cleaning up the frames was messy and long task, and then there's all that nasty metalic paint a previous owner painted on everything.

The mystery gasket
After five hours of messing with this window, I gave up, covered the empty window hole with plastic, stored my tools and took a shower. I headed out to a sale at Nordstroms and finally felt restored to girliness again. When I returned home I had acquired a new suit, a Pucci scarf and miscellaneous underthings. So, we spent the evening watching tv (Miss Marple, World at War on PBS) and I started polishing the window frame with my Dremel. I have only cleaned up one half of the frame. This is going to take some time and effort to finish, darnitall.

Window taped up for rain
Saturday I woke up achey, but I downed a couple of naproxen, strapped on my respirator and safety glasses and headed to work. The time horizon for this effort is somewhat limited--when we attack the back of the trailer, we'll be removing the tub, so I want to refinish it before that time.
After several hours of fighting a bucking sander, I stood up and removed myself from the tub. Granted, it was a cold, wet, rainy day--but every muscle in my body was stiff and cramped. I felt miserable. Moreover, I was completely covered with epoxy dust. Quickly I jumped into a hot tub and scrubbed myself all over. When I got out, I was sorer still. After a couple more hours of pain, I gave in and downed a Celebrex and went to bed.
By morning, the Celebrex had kicked in. Today, Rick was going to help me for part of the day (he's studying for finals right now). First we went out to Home Depot for a new Dremel head, then had breakfast out. When we got back, I put my "dust clothes" on and went back to sanding the tub. I sanded it to smooth across most of the surface. My next step will be to put a new layer of epoxy, smooth sand, then finish off with the refinishing compound (Homax's Tough as Tile). I am also going to reinforce a mended crack from the back when I get it out. Right now, I think if the rest of my steps go well, the results will be better than the original tub. I have found several "OEM" drips and spatters--these will be gone now.
Meanwhile, Rick took over in grinding down the cuts I made to the frame last Wednesday. Earlier last week, he bought a new Rotozip tool. He was looking forward to getting to use it.
My next goal is to replace all the seals on the windows. While Rick worked on his grinding, I got to work on refinishing my first window. I worked by following the project mentioned on RJ Dial's webpage.

Window seals are in bad repair...
And one window doesn't even have a gasket (that's just a fat bead of silicone holding that window in)!
The mystery gasket
Window taped up for rain
Subscribe to:
Comments (Atom)