Please note--these instructions only apply to 1961-1965 models. I based my approach on RJ Dial's directions.
Difficulty (Scale of 10 Drills): TBD
Materials Used:
Window Gasket (available from airstreamdreams.com)
Glazing Tape (available from airstreamdreams.com)
Carpet knife and fresh razors
Straight edged razor
Screwdriver
Pliers
Wire brushes (copper for exterior, steel for inside channel)
Plastic to cover windows
Window sealing tape (weather stripping dept of Home Depot)
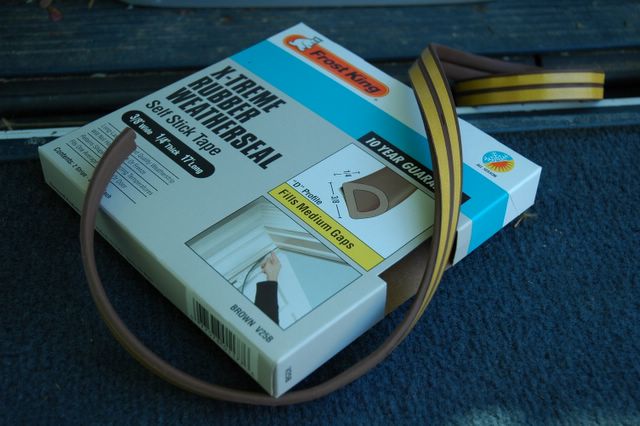
Frost King X-treme Rubber Weatherseal (or other rubber D shaped gasket) (or "Bulb seal" from Airstream Dreams
3m Super Weatherstrip Adhesive (yellow) (available from airstreamdreams.com)
Small cutting board
Gasket or adhesive remover (I used Permatex Gasket remover, purchased from Advanced Auto Parts)
Part 1: Window Removal
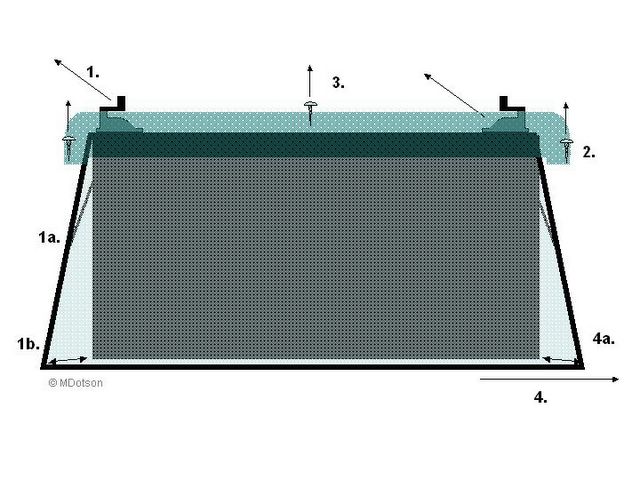
Hehr window removal (click to enlarge)
2. Unscrew the side screws holding the window drip channel down on one side (2). Bend the channel up, so the window will slide past it. There is a small screw in the center of the window(3). If you cannot unscrew it by hand, use a set of plyers to remove it (a screwdriver will not reach this screw).
3. Lift the window up to about 2/3 open. Steadily push it out of its channel, towards the direction where you bent the drip channel up (4). This will release the window.
4. Before working with the window, cover the window with plastic and tape. Home centers sell a weather resistant tape with weatherstripping supplies. This product is good, although do note that it will leave a little residue glue on your trailer (though it cleans up easily).

Taped up window
* Hand crank removal: Unscrew the operators from the inside of the trailer. Open the windows so that the arm aligns with the cutout portion of the channel. Inside the channel, the arm is secured to a little plastic slider with a spring. You may be able to ease the slider out or get it out by compressing the spring. Chances are, it will break, since the plastic tends to harden. Replacements (without springs) are available from Inland RV, however, they are very costly. RJ Dial suggests using a nylon nut and bolt instead, which I am going to try when I address this problem.
Part 2: Window Repair

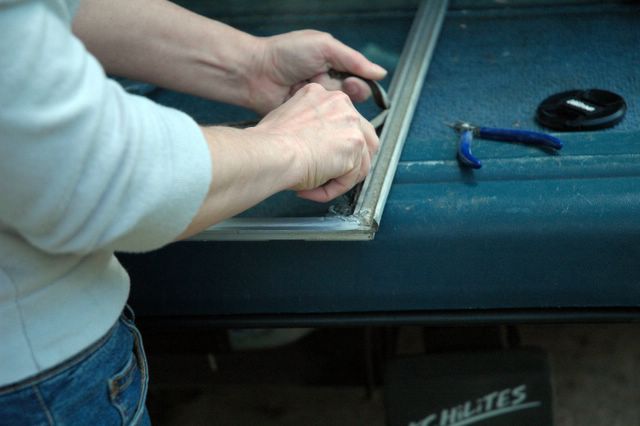
Start removal of the old gasket at the corners
Once you get the corner out, it is easy to pry the rest loose with a screw driver.

Working out the old gasket
2. The toughest part for me is removing the glass from the glazing tape. Right now I'm experimenting with applying different kinds of adhesive/gasket removers to the crack where the glass meets the aluminum, in hopes that it will seep down and soften the glazing tape. Hopefully, this will work and you can gently pry the glass out of the frame using a carpet razor. So far, this has led us to broken glass. Fortunately, the windows from this era were made of generic glass and are easily replaced.
3. Clean out the old glazing tape using gasket remover (I found Permatex gasket remover worked best). Scrub this channel clean (I used a wire brush), as it is your primary waterproof seal area. Optional--clean and polish the exterior of the frame (see earlier entry on this).

Removing old window adhesive
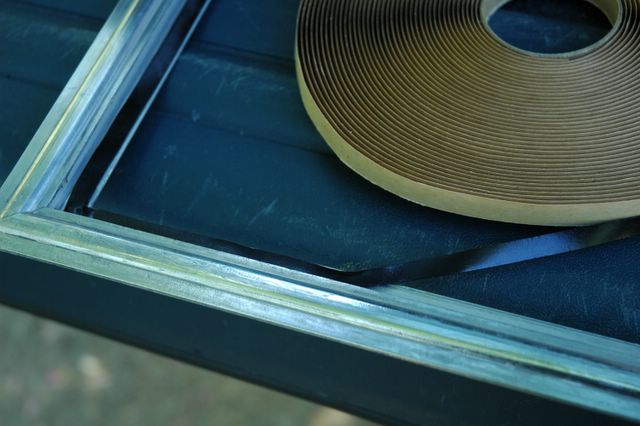
4. Roll out a strip of new glazing tape into the channel where the old glazing tape was. Trim it so there are no gaps. Carefully lower the glass pane back into the frame, setting it down on the glazing tape (I found this easiest with a helper, since there is no moving the glass again after you've set it down--that glazing tape really sticks to glass).

Applying glazing tape
5. Use a flat edged razor and a small cutting board to mitre the starting edge of the new window gasket. Firmly pry it into the corner, making sure the lip gets wedged into the channel. Feed and pry it in place without stretching it. When you come close (say, 2 inches) to a corner, calculate where to cut it. I find it easiest to finish if I wedge it into the corner first, then work back to where I stopped to trim it.
6. Replace the window, reversing the procedures detailed previously. I am buying replacement operators, so I have not reinstalled these. I will post more info on this, when I do.
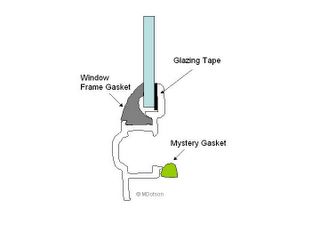
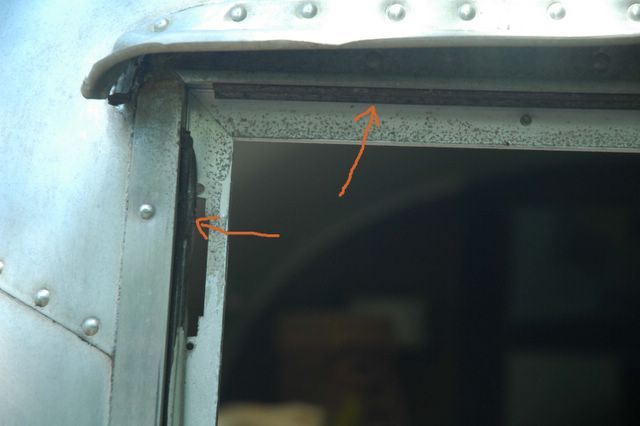
Part 3: The Mystery Gasket
I found a mystery gasket sealed the window inside the trailer wall. It is green in the window profile drawing above. You can also see a photo of it in the wall here.

The mystery gasket
This was stiff and cracked, so I decided to replace it as well. To do this, I bought "D" shaped gasket at Home Depot.

Replacement for the mystery gasket--later I found it in grey, which looks much less conspicous
1. Remove the old gasket and clean the channel it sat in with window cleaner.
2. I found that the adhesive on the new gasket was inadequate. Instead, use 3m Super Weatherstrip Adhesive on the gasket, press it into place. Trim at the ends.
Since writing this, Airstream Dreams has solved the identity of the mystery gasket. It is called "bulb seal" and it will be available at their website starting 6/17/05. Unlike weatherstrip, it will not require adhesive. While I have completed all my windows with weatherseal, I am going to test out the new "bulb seal" one one window. My impression is that it will probably be a bit more durable than weatherstripping (which I expect will only be good for a year or two), though I don't know if it will give as tight a seal.
Part 2: Window Repair

Window profile(click to enlarge)
1. Put the window on a smooth, cushioned surface. Work the old gasket out of the window. I found it easiest to start at the corners, inserting a carpet razor into the outer edge and then working it out.
Start removal of the old gasket at the corners
Working out the old gasket
3. Clean out the old glazing tape using gasket remover (I found Permatex gasket remover worked best). Scrub this channel clean (I used a wire brush), as it is your primary waterproof seal area. Optional--clean and polish the exterior of the frame (see earlier entry on this).

Removing old window adhesive
Applying glazing tape
6. Replace the window, reversing the procedures detailed previously. I am buying replacement operators, so I have not reinstalled these. I will post more info on this, when I do.
Part 3: The Mystery Gasket
I found a mystery gasket sealed the window inside the trailer wall. It is green in the window profile drawing above. You can also see a photo of it in the wall here.

The mystery gasket
Replacement for the mystery gasket--later I found it in grey, which looks much less conspicous
2. I found that the adhesive on the new gasket was inadequate. Instead, use 3m Super Weatherstrip Adhesive on the gasket, press it into place. Trim at the ends.
Since writing this, Airstream Dreams has solved the identity of the mystery gasket. It is called "bulb seal" and it will be available at their website starting 6/17/05. Unlike weatherstrip, it will not require adhesive. While I have completed all my windows with weatherseal, I am going to test out the new "bulb seal" one one window. My impression is that it will probably be a bit more durable than weatherstripping (which I expect will only be good for a year or two), though I don't know if it will give as tight a seal.
No comments:
Post a Comment